Account Ledger
View transactions by account with running balances, date filtering, and export options
Account Ledger
The Account Ledger report lets you drill into a single account and see every transaction that affected it over a chosen period. Use it to reconcile balances, trace specific transactions, investigate discrepancies, or prepare supporting schedules for audits.
The report has two pages: an account browser where you find the account, and an account detail view where you inspect its transactions.
How to Access the Account Ledger
- Navigate to Reports from the sidebar.
- Under Financial Reports, click Ledger (or Account Ledger).
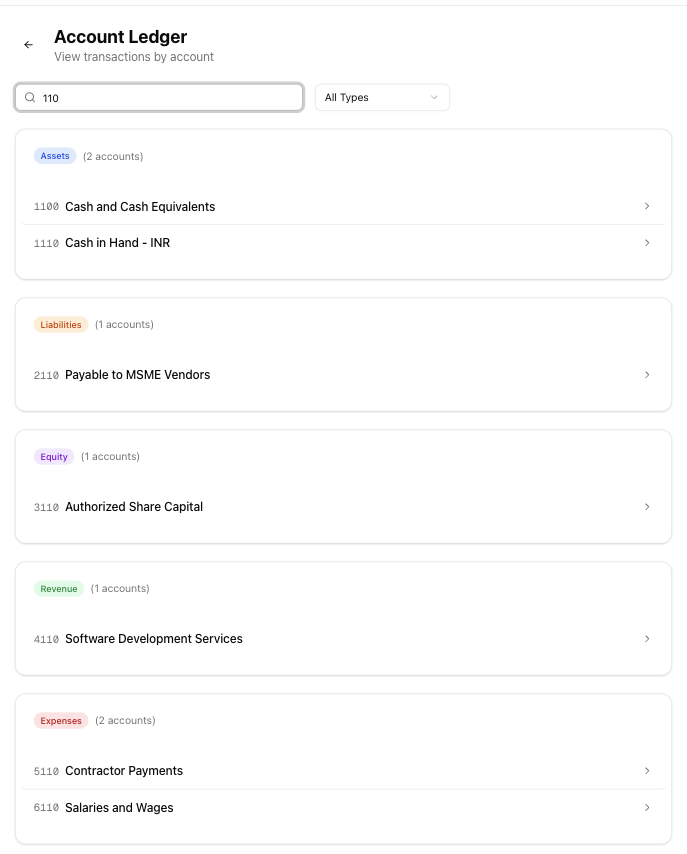
- You will land on the account browser page, which lists every account in your Chart of Accounts grouped by type.
- Find the account you want to inspect using the search bar or type filter (described below).
- Click an account row to open its detail view.
Searching and Filtering Accounts
The account browser provides two ways to narrow down the list:
- Search — Type in the search box to filter accounts by name or account code. The list updates as you type.
- Account type dropdown — Filter by All Types, Assets, Liabilities, Equity, Revenue, or Expenses. Selecting a type hides all other groups.
Accounts are displayed in collapsible sections grouped by type. Each row shows the account code (in monospace), the account name, and a colour-coded type badge (blue for Assets, orange for Liabilities, purple for Equity, green for Revenue, red for Expenses).
If no accounts match your search or filter, an empty state message appears: "No accounts found. Create accounts in Settings > Chart of Accounts."
Viewing an Account's Transactions
Click any account row to open its detail view, which shows all transactions posted to that account within the selected date range.
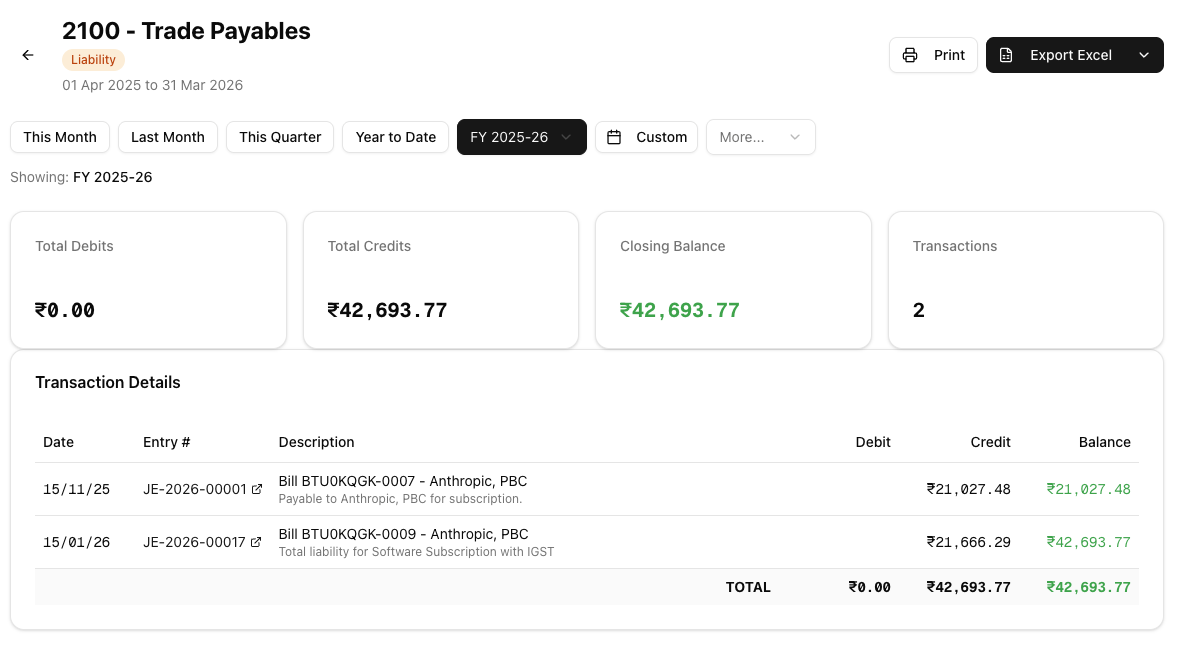
Summary Cards
Four cards appear at the top of the detail view:
- Total Debits — Sum of all debit entries for the selected period.
- Total Credits — Sum of all credit entries for the selected period.
- Closing Balance — Net balance at the end of the period, colour-coded green when favourable and red when adverse.
- Transactions — Total number of transaction lines in the selected period.
Transaction Table
A table below the cards lists every transaction with these columns:
| Column | Description |
|---|---|
| Date | The date the transaction was posted. |
| Entry # | The journal entry number, linked to the full transaction in the Transactions section. Click it to view or edit the original entry. |
| Description | The transaction description and narration. |
| Debit | The debit amount, if applicable. |
| Credit | The credit amount, if applicable. |
| Balance | The running balance after this transaction, colour-coded green for a positive balance and red for a negative balance. |
A totals row at the bottom summarises Total Debits, Total Credits, and the Closing Balance.
If no transactions exist for the selected period, an empty state appears with a link to record a new transaction.
Choosing a Date Range
Use the date picker at the top of the detail view to control which transactions appear. You can:
- Select a preset — This Month, Last Month, This Quarter, or Year to Date.
- Pick a custom range — Choose specific start and end dates for any period you need.
- Switch financial year — Use the financial year selector to jump to a prior year without manually entering dates.
The summary cards and transaction table update automatically when you change the date range.

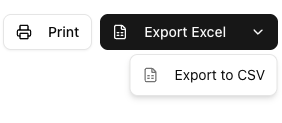
Exporting the Ledger
If you have the reports export permission, three export options are available from the report header on the account detail page:
- Excel (.xlsx) — Downloads a spreadsheet containing the full transaction list with all columns. This is the primary export option.
- CSV — Downloads a plain-text comma-separated file with the same structure, useful for importing into other tools.
- Print — Opens your browser's print dialog so you can print the ledger or save it as a PDF using your browser's built-in "Save as PDF" option.
If you do not see the export buttons, ask your team admin to grant you the reports.export permission.
Tips and Best Practices
- Reconcile regularly. Open each bank and cash account's ledger at month-end and compare the closing balance against your bank statement.
- Use the Entry # links. Click the entry number to jump to the original journal entry and see the full context, including the other accounts affected.
- Filter by date range first. Narrow the period before scrolling through transactions. Presets like "This Month" help you focus on recent activity.
- Cross-check with the Trial Balance. The closing balance in the ledger should match the corresponding line on the Trial Balance. If they differ, check for unposted entries.
- Export for external review. Use the Excel export when sharing transaction detail with auditors or accountants so they can sort and annotate.
- Use the search to jump to accounts. Typing the first few characters of an account code or name is faster than scrolling the full list.
Related Articles
- Trial Balance — Verify that all account balances are correct before drilling into individual ledgers.
- Balance Sheet — View assets, liabilities, and equity at a point in time, with balances that tie back to account ledgers.
- Profit & Loss Statement — Review income and expenses for the period; each line item can be traced through the ledger.
- Date Ranges — Learn more about the date picker presets and financial year options available across all reports.
- AR Aging Reports — Track overdue customer invoices by age bucket to prioritise collections.